Homemade Valentine: Reese's Pieces

A Sweet Valentine's Day
Give your Valentine a sweet surprise with this homemade valentine featuring Reese's Pieces.
It's easy to make, so it's a great craft for kids, and it's cute enough to give to your boyfriend or girlfriend.
It's even great for a last minute Valentine's Day gift since one version of it only takes about 10 minutes to put together.
Different Versions of this Gift
There are a couple ways you can craft this cute little gift, make it the way you prefer.
Several Versions of This Valentine's Day Craft
There are several different versions of this craft you can make for Valentine's Day. Everything from super-duper easy to a bit more complicated. But all are pretty simple for anyone to create.
Simplest Reese's Pieces Valentine Day Gift
Make the Simplest Version
The simplest way to make this cute little craft is to print or write out the saying and just stick it on a package of Reese's Pieces.
All you need is a bag of candy, paper, scissors, and glue or tape. It only takes moments to make this version of candy cuteness.
Write Out a Label

Or Print Out a Tag

Right click on the above picture and save it to your computer to print it out for your Valentine's Day craft. Cut along the dotted line, then stick it on your bag of candy.
Get a Bag of Reese's Pieces
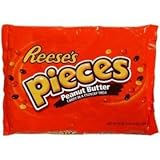
Apply Label to Bag of Reeses Pieces

That's It!
That's all there is to making the simplest version of this little gift.
This makes it easy to create last minute or from few supplies when you are in a hurry or just want to do a little something to make someone feel good.

Individual Reese's Pieces Packets
This is such an easy and fun project to do that you can easily make a bunch of these cute little Valentine's gifts.
Get enough individual packages of Reese's Pieces to show all your friends that you care. Or enough to give your entire class for Valentine's Day. Or even get some to do as a class project. It will work great for all of the above.
Easy Reese's Pieces Valentine's Day Gift
Make this Easy Homemade Gift
For the easy version of this Valentine's Day gift you'll decorate a jar, then fill it with candy.
You'll need:
- A small jar
- Permanent markers or nail polish
- Contrasting colors of paper
- Scissors
- Glue
- Ribbon
Get a Small Empty Jar

Get a Small Empty Jar
Pick out a small jar either from the store or that you can reuse. It's best to use a jar without markings, but all I had was this one which had markings on the lid. The size depends on how much candy you want to gift someone, but I like the size of a small artichoke heart jar which is what I used in the pictures.
Remove any labels and make sure the jar is clean and dry.
Use Permanent Marker on Empty Jar

Hide the Markings on the Jar
If your jar has markings on the lid or the lid is a bad color use a permanent marker to color the lid. You can also use fingernail polish which covers better.
Do a couple coats if necessary, letting the lid dry thoroughly between.
Don't worry too much about this step as the paper and ribbon will hide most of the lid. The yellow of my lid was totally wrong for the look I wanted, so I colored over it with a better color.
Let Lid Dry Thoroughly

Get Jars
If you don't have a nice jar pick up one or more new jars for your Reese's Pieces Valentine's Day gift. It always looks better to package this in a nice jar and it makes it so much faster and easier.
Heart Shaped Bottle
This is a perfect bottle to use in this craft.
The bottle is clear, so you can easily see the Reese's Pieces. My favorite part is that it's heart-shaped, so it looks really pretty.
I'm sure you can just picture it filled with candies with a cute tag attached. What a perfect gift for a special someone!
Plastic Jar
Since many schools do not allow glass, if you are crafting to give out in class, you probably want to make them in plastic containers.
These plastic jars are really nice looking, they don't look like plastic at all, and yet they are safe to take to school.
Plastic jars work better if adding stickers or other items to the outside as well.
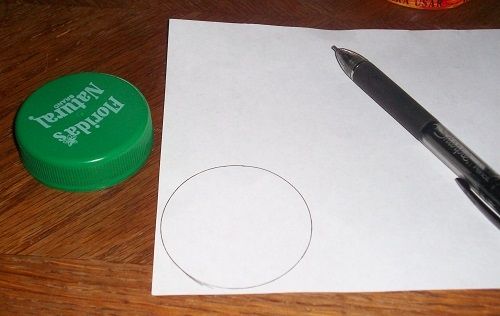
Place the Lid Upside Down on Colored Paper

Paper Color Choice
Pick a nice base color or paper, something that will look good with your ribbon and whatever color your lid is now.
Of course, being Valentine's Day, I went with a reddish colored lid and pink paper.
Trace the Lid On the Paper

Making the Lid Cover
After you trace out the lid on your pretty paper, carefully cut out the circle. Go slowly so it looks nice and doesn't have any jagged edges.
Cut Out the Circle

Contrasting Paper Lid Cover
After you cut out the first circle, you'll need to do another one, this one slightly smaller.
Use a light colored paper in a contrasting color so that the recipient can read the writing you apply to it and it will look good against the other circle of paper.
Trace out a circle slightly smaller than the one on the lid. You can use a smaller lid as I did here or just free-draw it if you can manage nice circles.
Trace Another Smaller Circle for Lid on Different Colored Paper
Making the Lid Pretty
Cut out the second circle so that there are two circles cut out of different colored paper, one slightly smaller than the other.
Now you should have a painted or colored lid and two circles of paper, all in contrasting colors that will look nice for the gift.
Circles Cut Out for Valentine Gift

Affix the Paper Circles to the Lid
Smear some glue onto the lid of the jar. Don't apply it too heavily or the paper will end up warped from the wetness. You may want to use a glue stick or spread out the liquid glue with your finger so it isn't all clumped up.
Apply Glue to Lid

Glue the Larger Paper Circle to the Lid
Before the glue has a chance to dry, press the larger circle onto the lid. Make sure it is even and smooth out any wrinkles if necessary.
Glue the Larger Circle to the Lid

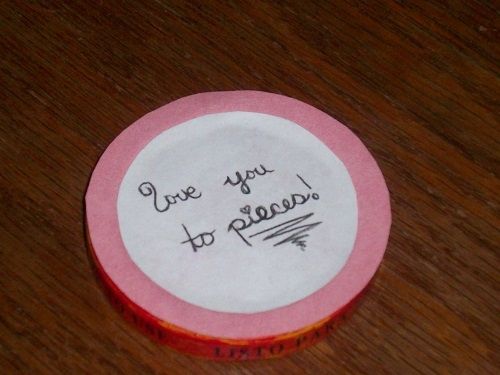
Add Writing
While the larger circle is drying on top of the lid, decorate the smaller circle.
Write a cute phrase on it such as:
- You make me fall to pieces!
- I love you to pieces!
- You're one sweet piece!
Of course, use a good pen and your nicest handwriting so it looks good. I like to underline the wordplay so that people get it right away.
Write on Phrase on the Smaller Circle

Decorate the Smaller Circle Instead
You don't have to write the phrase on the smaller circle of paper. You could glue a decorative label to the jar instead.
Or another option if you want you can instead add a hanging tag with the cute phrase on it.
If you choose not to add the phrase to the smaller circle you may want to decorate it with some hearts or a design so it looks pretty.
Print Out a Label

Right click on picture above and save it to your computer to print it out for your Reese's Pieces Valentine's Gift.
Get Hanging Labels
Instead of a stick-on label, you could make a hanging label to hang on the bottle instead. Either print out the image above or craft your own.
You can make a cute label in a heart shape or just rectangular, then poke a hole through a corner and use ribbon to string it up so dangle from the neck of the bottle. They would look adorable
I think hanging labels add a really cute touch.
Apply Some Glue to Lid

Glue the Smaller Circle to the Lid
When the larger circle's glue is dry and secure and you have finished decorating or writing on the smaller circle it is time to affix that to the jar lid as well.
Spread a small amount of glue on the lid over the top of the bottom circle where the smaller circle will fit, then stick smaller circle to the lid. Again, go gently with the glue so none will squeeze out the sides or make the paper bubble. And center the paper well so that it is not askew on top of the lid.
Let Lid Dry
Let the Glue Dry Well
After gluing the circles to the lid of the jar, let it dry completely. If you start the next step with the glue still wet you may smear the writing or move the paper off-center so give it at least a few minutes to dry.
Adding Ribbon

Add Ribbon to Lid
Cut a ribbon long enough to fit around the lid, then glue it on the edge of the lid.
Another option is just to tie a pretty bow around the neck of your jar using the ribbon. Either way, the ribbon adds a pretty touch.
Get Pretty Ribbon for this Craft

Decorate the Jar Version One
Paint Hearts on the Jar
If you want to add an extra touch, you can add hearts to the jar.
One way to do this is to use fingernail polish. Fingernail polish sticks really well to many surfaces, including the often difficult one-- glass. It also comes in lots of colors and so it's perfect for use in crafting.
Pick a fingernail polish in a festive color that will look good with the colors on the lid. Then use it to paint small hearts on the jar. You may need to do a couple of coats so that the hearts really pop.
Paint Hearts on Jar with Fingernail Polish

Let the Hearts Dry
Let the fingernail polish hearts dry well.
Once they are dry, see if they are too translucent and add another coat of paint if necessary.
Then once again let them dry. Letting things dry thoroughly is important as trying to hurry things along only results in smeared work and having to start over.
Let the Hearts Dry

Decorate the Jar Version Two
Stick Paper Hearts on Jar
Don't like the fingernail polish hearts? Another way you can decorate the jar is with paper.
Freehand some small hearts, then cut them out of paper. Spend a little time making sure the hearts look good before applying them. Trim them if necessary so they are nice and even and smooth looking.
Use a little dab of glue to stick each paper heart to the jar.


Valentine Heart Decorations
Instead of painting on hearts or cutting them out, you can get some cute heart rhinestones to stick on the jar.
Some of the heart shaped rhinestones even have sticky backs so they'll be easy to apply, but even if they don't it's simple to use a hot glue gun to tack them to it.
The rhinestone hearts really add a nice little touch and sparkle.
Fill Jar with Reeses Pieces

Finishing the Craft
Once the jar and lid are decorated and dry, it's time to assemble the craft.
Fill the jar with Reese's Pieces, then screw on the lid. Add a bow or other decoration if you feel it is needed.
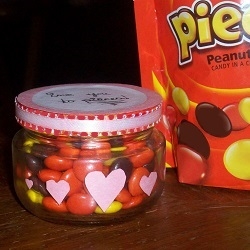
Admire the effect of your finished project and know someone is going to adore this cute little craft.
Finished Valentine's Day Gift - Ready to Give on Valentine's Day

Heart Shaped Candy Containers
Instead of the jar, you can also find small little metal or plastic tins that you can fill with candy.
These little containers are even useful after the recipient has eaten all the candy.
I think these small, heart-shaped candy containers would look great filled with Reese's Pieces with a nice heart-shaped label.
More DIY Valentine's Day Craft Ideas
Homemade Valentine's Gifts
Do you like homemade Valentine's Day gifts?
© 2013 Alisha Vargas


